
 I kind of have a kitchen storage problem. It has resulted in the "cabinet of peril" (basically, to get anything out or even to open this cabinet was risky. Glass jars were not allowed on the edge of the shelves) and the combination coat closet/pantry. To say this is ridiculous is just a bit of an understatement. But I happened upon a grand solution.
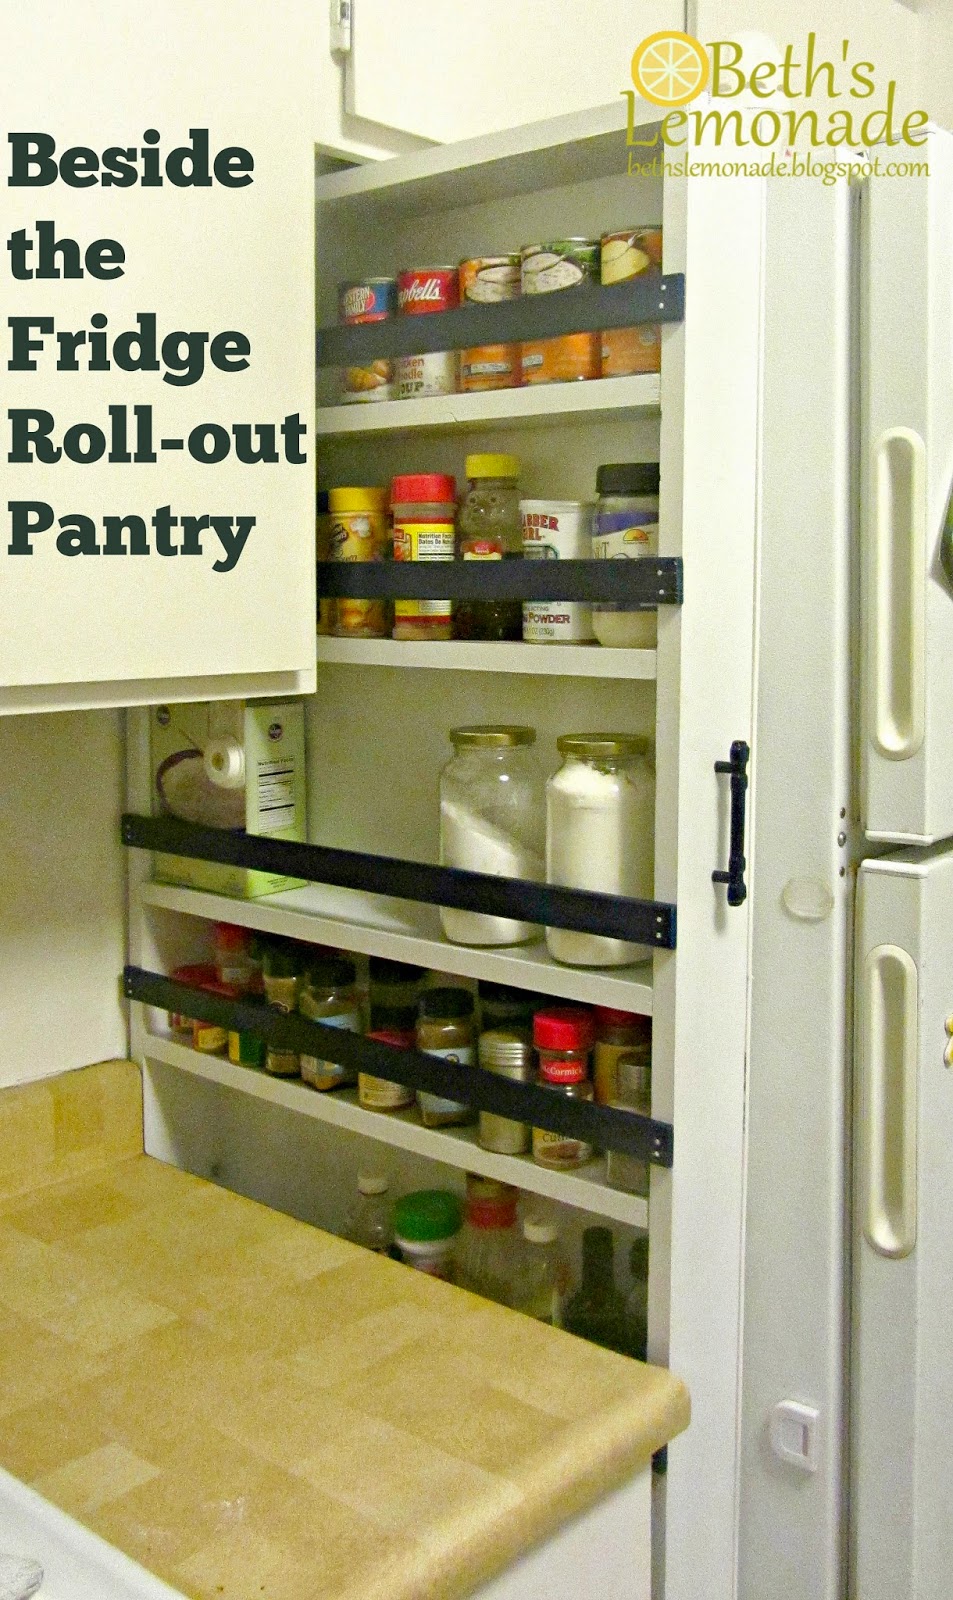
This was a brilliant idea, but was not mine. I first saw it here, but she saw it at Learning to Be Me. That blog doesn't credit the idea specifically to anyone, so it may have come from there. I have seen multiple other versions of it, however. The concept is much the same in all cases though; build a box, insert shelves, dowels, and a back, and put the whole thing on wheels. Brilliant. I made a few tweaks, but this is essentially the same thing I did.
 My final tweak was that I ditched the dowels in favor of nailing on some trim to keep stuff on the shelves. I could have used lath strips, though that would involve a lot of sanding. My Home Depot sells individual strips for 55 cents, so this would definitely be a cheap option. My thought process behind this was to give my self the absolute maximum amount of space possible on the shelves as the dowel will take up a fair amount of space in proportion to the three and a half inches the shelf is. I don't know how other people got spaghetti sauce jars on there with the dowels. I assume the brand they buy must be narrower.
I could have built this whole thing for around $35. I decided to do a few other fancy things (like paint), so it was a little higher for me. Also, that $35 does include getting a back for only $6, which was a rather exciting find for another post. It would have cost more (I was thinking around $20 depending on what you used) if I hadn't gone to Home Depot on the right day. I also lucked out and had the casters from an old industrial desk that was sitting on the front porch of our first apartment. Our theory is that a previous tenant decided it wouldn't fit inside (it was a 364 square foot apartment including walls). Our landlord told us we could get rid of the desk, and we kept the casters. I just cleaned them up for this project.
 |
Pantry of Coats and Cabinet of Peril. I think it is pretty clear
there was a problem here.
|
My first tweak to the other plans was fitting it to my space and then fitting it to waste as little wood as possible. I could have made my shelves wider, but I settled on 2 feet total for the shelves because it worked out best for wasting the least wood. It also worked out perfectly with the back, but that was a happy coincidence.
Next I made the shelves not equally spaced. I wanted to get as much stuff on this thing as possible. That meant making tall shelves for tall things and short shelves for things like spices. I took things I wanted to get on the shelves and used them to decide on spacing. If you do this, remember that the item does not only have to fit between the shelf and the next one, it also has to be able to be pulled over the guard. It is kind of a bit tricky to determine how tall you want the shelves, but in the end I had 8. The height of my shelves was also dictated partially by the back I decided to use; the back came in 3 pieces and I wanted a shelf at each of the joints.
My final tweak was that I ditched the dowels in favor of nailing on some trim to keep stuff on the shelves. I could have used lath strips, though that would involve a lot of sanding. My Home Depot sells individual strips for 55 cents, so this would definitely be a cheap option. My thought process behind this was to give my self the absolute maximum amount of space possible on the shelves as the dowel will take up a fair amount of space in proportion to the three and a half inches the shelf is. I don't know how other people got spaghetti sauce jars on there with the dowels. I assume the brand they buy must be narrower.
This project took me about a week and a half, working during nap times and after the boys were in bed (but not every day). The most time consuming part was the back, which was a project in a project (so not anything you would have to do) and I did the whole project largely by myself. Patrick helped me screw in a few of the shelves and helped me put on the casters as I had to countersink the bolts and didn't know where those drill bits were (or actually where the bolts were, since they had come with the casters. We also had to remove the second shelf to countersink the bolts, so I would recommend thinking about the casters a little earlier in the project than I did. I used a Kreg jig to assemble the body. I am kind of in love with that tool; it is well worth the money.
The project cleared out my cabinets, so I am more than happy. We will be installing some kind of stop so it doesn't come all the way out as it is not free standing. If you pulled it out all the way, it could easily fall on you.
What I did on the back:
 |
| Do It Yourself Dry Erase Calendar with Spray Paint |
Other posts you may be interested in:
 |
| Printer Garage from Drawer |
 |
| Makeshift Vanity From Custom Shelves |
Wow, this looks really, really good. You are getting to be quite the woodworker.
ReplyDelete